Monday, October 31, 2011

Simple AM Transmitter Circuit

AM transmitter circuit that can transmit your audios to your backyard.This circuit is designed with limited the power output to match the FCC regulations and still produces enough amplitude modulation of voice in the medium wave band to satisfy your personal needs. You will love this. 

The circuit has two parts , an audio amplifier and a radio frequency oscillator. The oscillator is built around Q1 (BC109) and related components. The tank circuit with inductance L1 and capacitance VC1 is tunable in the range of 500kHz to 1600KHz. 

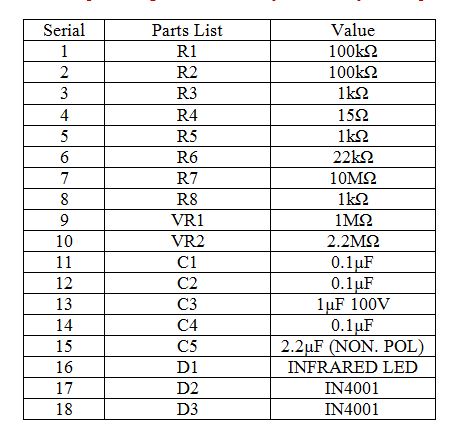
These components can be easily obtained from your old medium wave radio. Q1 is provided with regenerative feedback by connecting the base and collector of Q1 to opposite ends of the tank circuit. C2 ,the 1nF capacitance , couples signals from the base to the top of L1, and C4 the 100pF capacitance ensures that the oscillation is transfered from collector, to the emitter, and through the internal base emitter resistance of the transistor Q2 (BC 109) , back to the base again. 

The resistor R7 has a vital part in this circuit. It ensures that the oscillation will not be shunted to ground trough the very low value internal emitter resistance, re of Q1(BC 109), and also increases the input impedance such that the modulation signal will not be shunted to ground.

Q2 is wired as a common emitter RF amplifier, C5 decouples the emitter resistance and unleashes full gain of this stage. The microphone can be electret condenser microphone and the amount of AM modulation can be adjusted by the 4.7 K variable resistanceR5.

Saturday, October 8, 2011

AM Receiver Circuit Diagram Using ZN414 IC

A.M. Antenna coil and MW gang connected in parallel. One common point of this parallel circuit connected to the IC ZN414 pin number 2.

Another common point of that parallel circuit connected with two resistors (100kΩ, 1kΩ) in series. A capacitor is connected with the common point of resistors (100kΩ, 1kΩ).  A capacitor is connected in series with base of the transistor and the pin number 1 of the ZN414.
One end of the 10kΩ resistor is connected with the collector point of the transistor BC549 and another end is connected with the power supply +Vcc.

And one end of the 100kΩ resistor is connected with the collector and another end connected with base. 105pF capacitor is connected between collector and ground. Pin 3 of IC ZN414 and emitter of the transistor is connected to the ground.

 Required Instrument
  • IC ZN 414.
  • Capacitor(105pF×1,104pF×2,103pF×1)
  • MW Gang
  • Resistor(100kΩ×2,10kΩ×1,1kΩ×1,470Ω×1)
  • AM antenna
  • Transistor(BC549)

Saturday, September 24, 2011

AM Transmitter Circuit Diagram Using 741 Op-amp

AM transmitter is a circuit which can transmit message signal to modulated signal. This circuit is designed with limited power and the required power supply of the transmitter circuit is 9 Volt.

The circuit has three parts that is an audio amplifier, radio frequency oscillator and modulator circuit. The frequency oscillator is built with 741 Op-amp and related components. The carrier signal frequency and its amplitude can be varied using variable resistor accordance with VR1 and VR2  respectively.  C1 and C2 are the main components to generate the carrier frequency.

Another part of the circuit is an audio amplifier circuit. The audio amplifier is built with 741 Op-amp and related components. A microphone is used to convert the voice signal to the audio signal which is feed to the op-amp’s inverting terminal. This audio signal is amplified by the op-amp. The amplified audio signal is filtered using the capacitor C7. This output is feed to the modulator circuit.

The main part of the AM transmitter is modulator circuit which is built with the transistor BC109. The carrier signal is feed to the base of transistor and the message / audio signal is also feed to the emitter of the transistor.
Here the required modulated signal is taken from the collector of the transistor which is feed to the output antenna.

Tuesday, August 30, 2011

Luggage Protector Circuit Using 555 Timer IC

The circuit is called protector alarm circuit to protect from the theft of your luggage or bags. This circuit is built electronically using 555 timer IC. The alarm will rise highly when the thin wire is cut off by the thief.  The circuit configuration using 555 timer IC acts as a astable multivibrator which produce signal tone of frequency of about 1 KHz and produce sound like a shrill noise away the output speaker.

If you need to know 555 Timer configuration click here and download
IC’s 5number pin is directly connected to the power supply. 10k, 68k resistor and 0.01uf capacitor are connected to generate specific range of frequency like as 1KHz. You can change output frequency by changing the value of  resistor and capacitor.  Pin 1 is directly connected to the ground. Output is taken from pin 3. A 8Ohms speaker is connected to the output for alarm sound. Thin wire is connected as shown in figure.
The wire would be very thin copper like 36 SWG or higher. You can use one gage of normal wire. The driving voltage of the circuit is 5 Volt to 12 Volt.

Monday, August 29, 2011

Transistor AM Modulator Circuit Diagram


Modulation is the process of changing some characteristics (e.g. amplitude, frequency or phase) of a carrier wave in accordance with the intensity of the signal is known as modulation.

The figure shows the electronics circuit of a simple am modulator. It is essentially a CE amplifier having a voltage gain of A. The carrier signal is the input to the amplifier. The modulating signal is applied in the emitter resistance circuit. 

The carrier ec is applied at the input of the amplifier and the modulating signal es is applied in the emitter resistance circuit. The amplifier circuit amplifies the carrier by a factor A, so that the output is Aes. Since the modulating signal is a part of the biasing circuit, it products low frequency variations in the emitter circuit. This in turn causes variations in “A”.

The result is that amplitude of the carrier varies in accordance with the strength of the signal. Consequently, amplitude modulated output is obtained across RL. It may be noted that carrier should not influence the voltage gain A; only the modulating signal should do this. To achieve this objective, carries should have a small magnitude and signal should have a large magnitude.

Wednesday, August 17, 2011

A.M Modulator Circuit Diagram

Amplitude modulation is a process in which the amplitude of a carrier wave c(t) is varied about a mean value, linearly with the base-band signal m(t).
 
In amplitude modulation the amplitude of a high-frequency carrier is varied in direct proportion to the low-frequency (base-band) message signal. The carrier is usually a sinusoidal waveform that is,
C(t) = Ac . cos(wt)
Where,  is the carrier amplitude and fc is the carrier frequency.
The base-band signal or message signal is,
m(t) = Am . cos(wt) 
Where, Am is the amplitude of message signal and fm is the frequency of message signal.
An amplitude modulation wave may thus be described in its most general form as the function of the time as follows,
S(t) = m(t)×c(t)

Friday, August 12, 2011

Mini Auto Charger Fan Circuit

This circuit is called the auto circuit which can use any electronic device to operate it automatically. To make this circuit the cost is very low. Any interested student can make it very easily. The main component of this circuit is transistor. Its operation is very easy. 

The main purpose of this is to operate a charger fan where need 6volt battery. This circuit is mainly needed when the main power is OFF. That is called load shedding. Because at the time of  load shedding , 6volt battery operate the fan automatically. You don’t have need to ON the switch of the fan or OFF the fan switch. Only relay work this as a switch. The charging system is also automatically. On the other big matter is that no over charge is occurred of the battery. So the life time of the battery is increased. 

Component:
1.      Transistor ( npn ) – 2N2222, BC547
2.      Zener Diode - 6.8V
3.      Diode
4.       Relay - 6V
5.      Resistor – 1K, 100Ω
6.      Rechargeable Battery - 6V
7.      Fan - 6V
8.      Power supply - 6V

Operation:
This circuit is three section, input section and output section. 2N2222 transistor is used to control relay. BC547 transistor is used to control output section using relay. Zener diode and a diode connect with BC547 transistor base as a series connection. Zener diode always controls battery charge. It zener voltage is 6.8V which can’t overcome battery voltage.
When power supply voltage is applied to the 2N2222 transistor base the transistor is on. So the relay is ON relatively the output circuit is OFF. Inverse will occurs when power supply voltage is OFF. When 2N2222 transistor is ON then relay active only battery charging, relay deactivate the fan. Zener diode always keeps battery voltage full (6volt).
Advantages:
1.      Need not switch ON/OFF.
2.      It depends on AC power supply come or gone.
3.      This circuit is used when you are sleeping.
4.      Easy to make
5.      Cost is very low
6.      Components are few.
7.      Battery can’t over charge.
8.      Overall efficiency is 78%.
9.      Not you, only relay can do your work.
10.  The circuit is a small project for all students.

Thursday, July 7, 2011

Battery Charger Control Circuit


Battery charger control circuit is very useful now-a-days. You need not follow on battery charging or disconnect from ac power for avoiding over charge. This circuit is used to charge battery when the battery voltage drops below the minimum voltage that you want to connect it to a charger. When the battery voltage reaches the maximum voltage you want the charger to be connected.

This circuit is shown in figure. Let your battery voltage is 15 volt. When Ei drops below 10.5 V, V0 goes negative, releasing the relay to its normally closed position. The relay’s normally closed (NC) contacts connect the charger to battery Ei. Diode D1 protects the transistor against excessive reverse bias when V0 = -Vsat. When the battery charges to 13.5 V, V0 switches to disconnect the charger. Diode D2 protects both op-amp and resistor against transients developed by the relay’s collapsing magnetic field.

Suppose that the application requires an inverting voltage level detector with hysteresis. That is V0 must go low when Ei goes above Vut and V0 must go high when Ei drops below Vlt. For this application, do not change the circuit or design procedure for the non-inverting voltage level detectors, simply add an inverting amplifier, or inverting comparator, to the output Vo.

Tuesday, June 21, 2011

Heat Sensor Circuit


This is the simple heat sensor circuit. It can be used to control any device using heat sensor. In this circuit a thermistor and a resistance is connected in series. This arrangement makes a potential divider circuit.

Here the thermistor is Negative Temperature Coefficient type. So when the room temperature is increased its resistance decreases simultaneously and more current flows through the resistor and the thermistor. We find more voltage at the junction of the resistor and the thermistor.
 
Our thermistor resistance value is 110 ohms. Suppose the resistance value becomes 90 ohms after heating the 110 ohms thermistor. Then the voltage across one resistor of the voltage divider circuit equals the ratio of that resistor’s value and the sum of resistances of the voltage across the series combination. This is the concept of voltage divider. 

The final output voltage of the voltage divider circuit is now applied to the npn transistor (BC548) through the base resistor (3.3K ohms). Here the emitter resistor is replaced with a zener diode. Emitter voltage is maintained at 4.7volt with the help of zener diode. This voltage is used to compare voltage. Transistor conducts when base voltage is greater than the emitter voltage. Transistor conducts if it gets more than 4.7volt of base voltage. Then the circuit is completed through buzzer and it gives sound.


Monday, June 20, 2011

Active FM Antenna Amplifier of FM Booster


FM booster is one kind of a preamplifier which can be used to listen FM radio programs from distance FM stations clearly. The circuit comprises a common-emitter tuned RF preamplifier which tuned RF preamplifier wired around VHF/UHF transistor 2SC2570.

Serial
Parts Lists
Value
1
R1
27kΩ
2
R2
270Ω
3
R3
1kΩ
4
C1
5.6pF
5
C2
5.6pF
6
C3
1n
7
C4

8
C5
10pF
9
C6
0.1µF
10
VC1
22pF Trimmer capacitor
11
L1
1T FROM BOTTOM END
12
L2
3T, 20SWG 5mm DIA, AIR CORE
13
T1
2SC2570

Adjust input/ output trimmers (VC1/VC2) for maximum gain.

Thursday, June 16, 2011

3 digits Digital Ammeter using Microcontroller


Digital Ammeter is needed to do any kind of electronics circuit making. It is very much useful who is interested in electronics projects. Now-a-days there are many kind of digital or analog ammeter which are found in the market. But if you make such kind of digital meter then you have no no bounds happy.

The bellow circuit is digital Ammeter based on PIC16F684 and ACS712 current sensor. Here the measured ac/dc current will display on three digit 7-segment  with resolution 100mA. In this project current sensor is ACS712ELCTR-30A-T . This circuit can measure the ac or dc current up to 30mA with 66mV/A output sensitivity

The micro-controller PIC16F684 is used to read analog value from the ACS712 current sensor output and micro-controller convert to current and displaying on 7-segments display. For this circuit all 7-segment displays will be common anode type and it driven by PNP transistor BC557. Originally, this circuit is suitable for measuring DC current.

Remote Control Using the NE 555 and LM 567


Remote control circuit consists of two parts, one is transmitter and the other is receiver. A simple diagram is schematic remote control. The transmitter circuit’s transmitter IC is controlled by NE555. Receiver circuit works by the signal emitted frequency which is emitted by that transmitter circuit. Transmitted signal frequency must be equal to the frequency decoder of the receiver circuit. The NE 555 generated frequency is same that receive frequency of IC LM 567. 

The output frequency of the transmitter circuit is f,
f = 1.44/(Ra+2Rb)C
The resistor R1 is a receiver variable to facilitate the process of tuning. The system works well when the circuit is ready. The first step is tuning by way of the transmitter is turned on continuously, while the receiver R1 to set the value to be able to detect the signal transmitter. The second part is the receiver is controlled by LM 567. The following is a schematic drawing recipient.

f = 1 / (1.1 xR1xC1)
This frequency depends on the value of R1 and C1.

In the picture on top of each channel is designed with a different frequency. By considering the bandwidth of the frequency detection signal LM 567, inter-frequency channels should have a big enough difference, let’s try with a difference of 5 KHz.


Sunday, June 12, 2011

IR Remote Control Circuit using Op amp 741


IR circuit is called Infrared Circuit. Remote controls are very much popular now-a-days. It is specially called cordless circuit. This circuit is very simple and low cost cordless remote control circuit which is based on infrared   rays.

Figure 1 shows the transmitter circuit. The transmitter produces infrared rays and that can be easily transmitted up to 4 meters with a special convex lens and a twin LED arrangements.
Figure 2 shows the receiver  circuit. Op amp IC1-741 generates high frequency squire wave which provides the gate pulses for SCR1. IC1’s output current flows through  SRC1 and it is conducting current and enables the LED to emits infrared rays. The output frequency of Op amp IC1 depends on the variable resistor VR1, which in turns varies the output radiations of the LED.


When IR rays fall on the photo-transistor T1 of the receiver, then base of the photo-transistor’s base produces charge carriers at a rate depending on the rate of arrival of incident radiations at the pn junction of the transistor. Then the resulting emitter voltage is amplified by Op amp IC-2 . The amplified signal is rectified by D2. Finally the amplified signal is to drive the relay.

Parts List:

Thursday, May 26, 2011

Sound-Activated Switch using Op amp 741

          Sound activated switch shows how to make an adjustable reference voltage of 0 to 100V. We use a 10 kΩ pot, 5 kΩ resistor, and +15V supply to generate a convenient large adjustable voltage of 0 to 10V. Next we connect a 100:1 voltage divider that divides the 0 to 10V adjustment down to the desired 0 to 100mV adjustment reference voltage. Again, signal source Ei is used as a microphone and an alarm circuit is connected to the output.

          With this sound-activated switch, control by sound may be very useful in different ways. For example, a sound-activated light responding to a knock on the door or a hand clap. The light will be automatically switched off after a few seconds. Actually, the practical application that uses a positive level detector is the sound-activated switch shown in Figure.

          Any noise signal will generate an ac voltage and microphone is used as an input. The first positive swing of Op amp of Ei above Vref drives Vo to +Vsat. The diode now conducts a current pulse of 1 mA into the gate, G, of the silicon-controlled rectifier (SCR). Normally, the SCR’s anode, A, and cathode, K, terminals act like an open switch.


Fig: A sound-activated switch is made by connecting the output of a non-inverting voltage-level detector to an alarm circuit.


However, the gate current pulse makes the SCR turn on, and now the anode and cathode terminals act like a closed switch. The audible or visual alarm is now activated. Furthermore, the alarm stays on because once SCR has been turned on, it stays on until its anode-cathode circuit is opened.

            The circuit of Figure can be modified to photograph high-speed events such as a bullet penetrating a glass bulb. Some cameras have mechanical switch contacts that close to activate a stroboscopic flash. To build this sound-activated flash circuit, remove the alarm and connect anode and cathode terminals to the strobe input in place of the camera switch. If we open the camera shutter and fire the rifle at the glass bulb, the rifle’s sound will activate the switch.

        The strobe does the work of apparently stopping the bullet in midair. If we close the shutter, the position of the bullet in relation to the bulb in the picture will adjusted experimentally by moving the microphone closer to or farther from the rifle.


           We use sound activated switch circuit in different ways. For light activated relay switches, machine gun sounds, sound activated FM transmitter, sound effects generator electronic circuit, auction of test equipment and many other works we use this circuit. This sound activated switch circuit makes our activities easy and comfortable.